How to Prep Pizza Dough
Producing restaurant quality pizza at home takes a bit of practice but it isn’t rocket science. Of course, you won’t be able to make an authentic brick oven pizza, cooked at well over 700 Fahrenheit, but you can still make something delicious. Although it takes a little time, the end result is worth it. After a few tries, it will feel second nature, and amazing pizza will be the norm. Here are some tips to make stellar pizza the first time around.
Bread Flour
Why? Compared to pastry flour and all purpose flour, bread flour has a higher content of gluten, the protein that gives baked goods structure and texture. Pizza dough should have bounce and stretchiness. This translates into a super crusty, firm but soft product when fresh out of the oven.
Structure is also key if tons of pizza toppings are on the menu. How does one develop the flour’s gluten? Kneading. But one must knead the dough at the pivotal moment. When precisely is the pivotal kneading moment? Read on, pizza fanatic.

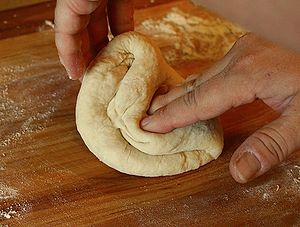
Pizza dough (Photo credit: Wikipedia)
Timing
All pizza dough begins with sugar, yeast, salt, flour, and a fat of some kind. The measurements should produce a fairly wet dough. Mix until the dough barely comes together and sticks to the sides of a bowl. Leave it in the mixing bowl, covered with a wet towel (not plastic), and let it rise for one to two hours.
Punch the risen dough down and explore these two options: Turn the dough out onto a floured board and knead it Nonna-style for six to 12 minutes. Or leave it in the mixing bowl and add a touch more flour; using the dough attachment, knead it for four to eight minutes.
Second Rising
This is a trick used by avowed pro pizza makers. After the first rising and main kneading session, divide dough into smaller, equal portions. Anoint each ball with a tiny bit of oil to prevent drying/flaking. Place in bowls. Cover bowls with plastic wrap. Put the bowls in the fridge.
This is retardation, or cold fermentation. The yeast behaves differently in a cold environment, producing more flavorful notes that make for pro-style delicious pizza. Also, retardation improves gluten structure, increasing the length of strands. This adds up to godly crust. Retardation can last from two hours to a week.
Proofing
Pull out a chilled ball and work it into the desired shape. Shoot for a thin center and a little puff around the edges. This raised portion, the part that swells and browns, is the cornicione, and it is second to ambrosia. Treat it that way. Let shaped pizza sit for two hours. This is called proofing.
Implements
Exalted pizza needs a pedestal. Invest in a pizza stone, baking steel, or cast iron pizza pan. These trap and conduct heat, cooking the underside of crust to perfection.
Cooking
Ditch the 400 degree oven. Preheat the baking implement under the broiler, roughly at 550 degrees. Transfer dressed pizza to implement. Surprise: Broil the pizza! Let the implement take care of the underside. If properly preheated, it should do the trick. Cook pizza to desired degree of brownness.
Behold: Homemade Pizza!


